
You spent time and money perfecting your logo. But the patch came out, and the small text looked blurred. That is not a problem with quality. For designs with fine detail, small fonts, or complex patterns, custom woven patches are the smarter choice. They’re made, using thinner threads woven directly into the fabric, which means sharper lines and cleaner results in all sizes.
If you’re a brand owner, a merch creator, or a uniform buyer, this guide covers everything you need to know before you order custom woven patches.
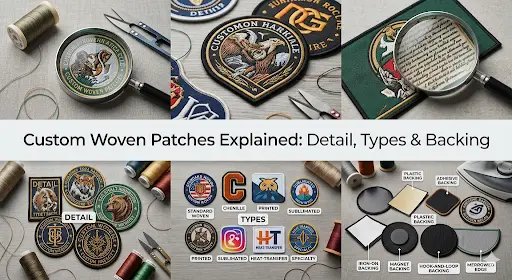
What Are Custom Woven Patches?
The fabric designs that are made by interlacing fine threads on a fabric are custom woven patches. Better than stitching a design onto a base, the design is formed while the weaving process itself, making the design part of the fabric, not an addition to it.
Built Like a Clothing Label
The production method closely mirrors how fabric labels are made inside garments. This gives woven patches their signature clean edges, readable small text, and accurate reproduction of detailed artwork.
A Surface That Lies Flat
Just a flat surface with a plain, classic, and sleek look that other patches will not provide. The surface of the patch is straight and leveled, and you will not feel any texture when you touch its surface. That is because the threads are fastened closely and tightly one after another during weaving.
Where Woven Patches Outperform Embroidery
Thin lines, small lettering, and intricate logo details are where woven patches genuinely shine. Designs that would lose clarity or appear distorted on an embroidered patch come through precisely on a woven one.
Woven vs Embroidered Patches
The Core Difference in One Sentence
Embroidered patches are built for bold, simple designs. Woven patches are built for detail, precision, and small text. Choosing the wrong one is the most common reason an order comes back looking nothing like the original artwork.
Where Embroidered Patches Excel
Bold Look
They have a textured finish that gives a classic and slightly 3D appearance.
Simple Designs
Best for logos and lettering without fine or complex details.
High Impact
Thick stitching makes designs stand out clearly from a distance.
Heavy Fabrics
Work well on denim, canvas, and jackets for a secure hold.
Durable Use
Built to last through regular wear and repeated use.
Where Woven Patches Take Over
Fine Details and Small Text
Woven custom clothing patches handle small lettering and intricate details that embroidery cannot produce clearly.
Clean Thin Lines
The tightly woven threads together keep lines sharp and smooth without blurring or merging.
High-Density Designs
They allow more detail in a smaller space by using finer threads and tighter construction.
Accurate Artwork production
Complex logos and illustrations come out looking just the same as the digital design.
Flat Finish
Unlike raised embroidery, woven patches keep a flat surface that preserves clarity and readability.
The Decision Rule
Use this as your starting point:
- Your design has text smaller than ½ inch, choose woven
- Your logo has thin lines or intricate detail, choose woven
- You need a bold, high-contrast design on heavy fabric, choose embroidered
- You are applying patches to hats, brand labels, or uniform sleeves, choose woven
- You want a classic, raised, tactile look, choose embroidered
How Custom Woven Patches Are Made
The process of making a custom woven patch is more precise and requires more thorough care than what most customers imagine, and knowing the steps will help you understand why the detail comes out so cleanly.
Step 1: Artwork Digitizing
The basis of this procedure starts with the design. Before any actual weaving of the custom patches begins, the artwork needs to be converted into a digital weave file, a format that tells exactly which thread goes where. At Patch Makers USA, this digitizing service is available, so you do not have to rush somewhere else. You just need to send your logo or artwork, and the rest is on the team to handle, so you are never left figuring out file formats on your own.
Step 2: Loom Setup
Once the digital weave file is ready, here comes the setting up of the loom, a specialized machine that wraps and weft the threads all together to form designs. The artwork is uploaded to the machine, the thread colors are loaded, the density is set, and the pattern is programmed in. This setup stage is what determines how accurately your design translates into a woven patch.
Step 3: Weaving
After the loom is set, the weaving of the threads together to produce the patch begins. It is different from embroidery, in which a machine stitches thread onto a fabric base, the loom builds the designed fabric without any base. This is what gives woven patches their evenly flat surface and fine, precise details.
Step 4: Cutting and Bordering
Once the weaving of the patch is done, the patches are now cut into their desired shape as the customer requested, whether that is a standard rectangle, a custom die-cut outline, or anything in between. Then the borders are added according to the demands of the customer.
Step 5: Backing Application
After the patches are neatly cut and bordered, the backing, through which the patch gets attached to any fabric, is then added to the back of the patch. Whether it is iron-on, sew-on, Velcro, or peel-and-stick, are applied, making the patch all done to attach to any garment or accessory.
Types of Woven Patches Explained
Standard Woven Patches
Clean, flat, and precise standard woven patches are the most widely usable option that works for most logos, text-heavy designs, and general branding needs.
Jacquard Woven Patches
A more advanced weaving method that handles multi-color and highly detailed designs with greater accuracy. When a design has complexity that standard weaving cannot fully produce, Jacquard woven patches are the answer.
Metallic Thread-Woven Patches
Gold or silver threads are wrapped and weft together into the design, adding a premium outer look that standard thread cannot create. Used selectively, metallic threads elevate a patch from functional to distinctive.
Label Woven Patches
Woven to clothing-label dimensions and durability standards. These patches go inside garments as brand identifiers, more permanent and refined than any printed alternative.
Laser-Cut Edge Patches
Laser cut edge patches produce a clean edge that follows the exact contour of the design without a merrowed border or standard frame, just the shape of the artwork itself is neatly cut.
Backing Options
Choosing different backings for patches will most probably affect how to attach a patch, how long it will stay attached, and how it performs on different fabrics.
1. Iron-On Backing
It is the best choice to quickly attach your patch while being at home. The iron-on patch glue melts when you apply heat on it, then it bonds with the fabric after melting and holds onto it.
Note: Custom Iron-on patches want thick, tightly woven fabrics so that they can tolerate heat to bond strongly with the fabric. Iron-on patches stick weakly to delicate fabrics like polyester or nylon, and will start peeling over time.
2. Sew-On Backing
The most long-lasting option for long-term and permanent attachment. Best for all fabric types, they are heavy-use patches for jackets, uniforms, and bags. It stands against frequent washing and rough and daily wear.
3. Velcro Backing
Ideal for patches on uniforms, tactical gear, or sportswear that might need to be removed or replaced. Come with hook and loop panels that make the removal and replacement as easy as a piece of cake.
4. Adhesive Backing
Best for temporary use or sampling. Works on smooth surfaces but is not recommended for long-term wear or repeated washing.
Quick Choice Tip
- Long-term use → Sew-on
- Easy application → Iron-on (cotton/denim only)
- Removable use → Velcro
- Temporary use → Peel-and-stick
Design Tips to Get the Best Result
If your design is thoroughly and precisely made, the outcome of the design as a patch will be clear and precise. Little adjustments before production can improve how your patch will look at the final stage.
Keep Text Readable
Text should not be smaller than 4–5 mm in height. As a general rule, use clear fonts and avoid very small lettering. for best readability,
Limit Color Count
Most woven patches work best with up to 15 thread colors. Lesser colors count produce a cleaner look while costing less.
Leave Safe Zone Margins
Keep the artwork and design within the size of the patch and away from the edges. This prevents details from being trimmed or crowded during cutting and border finishing.
Use Vector Files
Formats that can scale without the loss of quality, like AI, EPS, or SVG, are preferred because. Raster files, such as JPG or PNG, can lose quality and become blurry, which may cause issues in the mapping of threads when your design is being converted into a digital weave file.
Avoid Heavy Gradients
Thread cannot blend like printed ink. Too many gradients or shadow effects may lose clarity, so use solid colors where possible.
Watch Thin Lines
Lines under 1 mm may not weave cleanly and can disappear in production. Slightly thicker lines give sharper results.
Common Mistakes to Avoid
- Tiny text
- too many colors
- crowded layouts
- blurry image files
- overly detailed artwork
Who Uses Custom Woven Patches?
Fashion Brands
Used for clothing labels, jackets, and apparel branding.
Streetwear Brands
Popular on hoodies, bags, hats, and caps.
Military & Law Enforcement
Used for badges, name tags, and detailed emblems.
Sports Teams
Great for uniforms, club gear, and merch.
Corporate Businesses
Used on uniforms, caps, and promotional items.
Ordering Guide
How to place order at Patch Makers USA is easy: following points are to be considered before you place an order.
Minimum Order Quantities
Most USA Patch Makers start minimum orders at 25 to 50 pieces per design. Larger orders cut the price of a single patch.
Typical Price Range
The price of a patch depends on its size, quantity, and the backing you choose. Also, the complexity of the design affects the cost. Small bulk orders might range from $1 to $5 per patch, with better rates at higher volumes.
What to Send
- Artwork file (AI, EPS, or SVG)
- Patch size in inches
- Quantity needed
- Backing choice (iron-on, sew-on, Velcro, or adhesive)
- Border style and thread colors
Sample or Proof Process
Reliable suppliers like Patch Makers USA usually send a digital proof or sample preview before production. This will give you an idea of how your patch will look after production. It provides you with the chance to approve or change the color or design of the patch.
Turnaround Time
Standard production often takes 7–10 business days after approval. Rush orders are available for faster delivery but cost extra charges.
Smart Buying Tip
Order a few extra patches for future use, replacements, or new team members.
Care and Maintenance
Washing by Backing Type
- Sew-on: Machine wash cold or gentle cycle.
- Iron-on: Turn the garment inside out and use a hand wash with cold water.
- Velcro: Remove the patch before washing.
- Adhesive: Spot clean only, not ideal for washing.
Drying Tips
- Air dry only.
- High dryer heat can make glue backings weak, fade colors, and tear the threads.
Storage Tips
- Store patches in a cool, dry place away from direct sunlight.
- Keep them flat to prevent bending or curling.
- Avoid moisture and long sun exposure to help colors stay bright for longer.
FAQs
Ready to Turn Your Design Into a Woven Patch
Fine details, neat text, and a flat, finished professional appearance can only be achieved by choosing custom woven patches USA. When you require small letters, intricately designed logos, or thin lines in your artwork, you should choose woven patches.
If you still can not determine which patch type is best suited to your design, the Patch Makers USA team would be happy to examine your artwork and advise you accordingly. We offer digitizing services and provide digital proof before the production process starts. We also guarantee rapid turnaround.
Get your free quote by submitting your artwork to us today, and we will get started on your patch.
