
Ironing on patches looks easy to put on the clothes, but many people do it the wrong way. A suitable amount of heat is needed, wrong heat can damage patches, the Wrong fabric can make patches peel off, and can make patches look messy.
In this guide, you will learn how to use iron-on patches the right way, step by step, and how to apply iron-on patches on jackets, hoodies, jeans, hats, bags, and different fabrics. This guide also teaches how to remove patches, how to attach patches without an iron, how to iron on Girl Scout patches, and how to make your own patches.
What Are Iron-On Patches?
Iron-on patches have special glue on the back, which melts and gets sticky when the glue is heated with an iron. The hot iron helps the patch stick to clothes. Iron-on patches have a shiny or plastic-feeling back. If you want to know how to tell if patches are iron-on, check the back side, a smooth plastic back usually means it is an iron-on patch. This is how to tell if patches are iron-on easily.
What Patch Types Are Iron-On Compatible?
| Patch Type | Iron-On Safe? | Simple Notes |
| Embroidered Patches | Yes | Best and most common iron-on patch |
| Woven Patches | Yes | Thin and smooth patches |
| Chenille Patches | Yes | Use low or medium heat |
| Printed Patches | Yes | Easy to iron on |
| Sequin Patches | Careful | High heat can melt sequins |
| PVC Patches | No | Heat can melt PVC patches |
| Leather Patches | No | Iron can burn leather |
Fabric Compatibility Guide
| Fabric Type | Iron-On Safe? | Simple Instructions |
| Denim / Jeans | Yes | High heat works best |
| Cotton | Yes | Medium or high heat is good |
| Canvas | Yes | Great for bags and jackets |
| Wool | Careful | Use medium heat and a cloth on top |
| Flannel | Careful | Use medium heat |
| Polyester | Careful | Use low heat only |
| Nylon | Careful | Use very low heat and press quickly |
| Fleece / Sweatshirt | Careful | Use medium heat with a cloth |
| Mesh | Tricky | Patches may not stick well |
| Spandex / Lycra / Elastane | No | Heat can ruin stretchy fabric |
| Silk | No | Iron can burn silk |
| Leather / Suede | No | Heat can damage leather |
| Waterproof / Coated Fabric | No | Heat can melt the coating |
Tools & Equipment You Need
Clothes Iron
- A normal clothes iron works well for most patches
- Turn the steam OFF before using it
- Steam can stop patches from sticking properly
Heat Press Machine
- A heat press gives stronger and more even heat
- Great for big patches and bulk work
- Gives more professional results
Mini Travel Iron
- Small and easy to carry
- Good for tiny patches and small areas
- Does not heat as evenly as a normal iron
Hair Straightener
- Can work for very small patches
- Good for patching corners and edges
- Not good for large patches
Press Cloth
- A press cloth protects the patch and fabric from too much heat
- Thin cotton cloth
- Safe and reusable
- Good for most fabrics
- White pillowcase
- Easy to find at home
- Works well for basic ironing
- Parchment paper
- Protects delicate patches
- Good for sequins and shiny patches
Ironing Surface
- Use a hard and flat surface
- Heat works better on firm surfaces
- Soft, padded ironing boards may not press patches evenly
Clean Garment
- Clothes should be clean and dry
- Remove wrinkles before adding patches
- Dirty or wet fabric can stop patches from sticking well
Optional: Fabric Glue
- Best fabric glue for custom patches gives extra support
- Helps patches stay on longer
- Good for corners and heavy patches
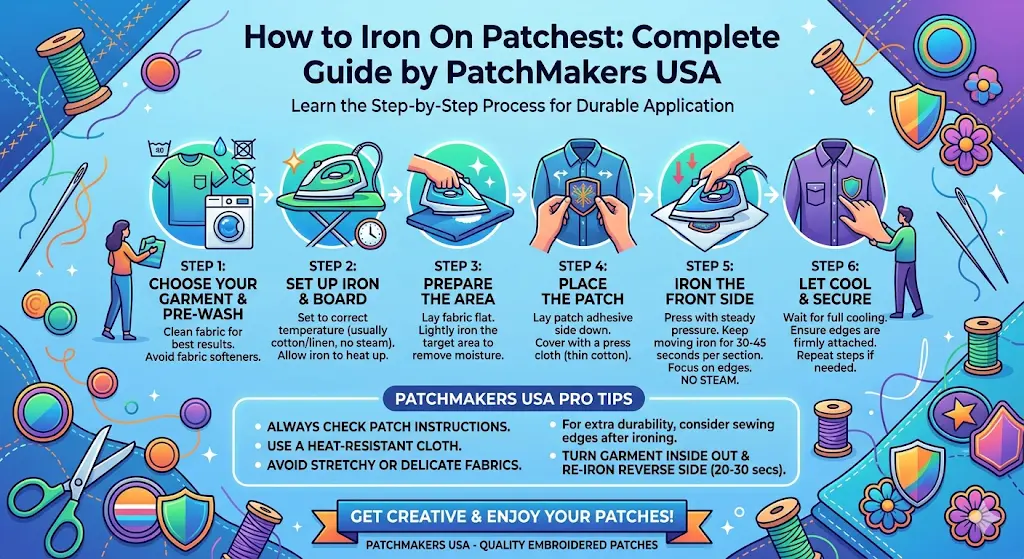
How to Iron on Patches
Step 1: Prepare Your Garment
First, clean the clothes by washing and then dry the clothes because clean fabric helps patches stick stronger. Iron the area where you want to put a patch for 5 to 10 seconds first to remove, if there might be any moisture and wrinkles. Put the clothes on a hard, flat surface. Hard surfaces press patches better. Soft ironing boards may not work well.
Step 2: Set the Right Temperature
| Fabric | Heat | Iron Setting |
| Cotton / Denim / Canvas | High heat | Cotton setting |
| Wool / Flannel | Medium heat | Wool setting |
| Polyester | Low heat | Delicate setting |
| Nylon / Fleece | Low heat | Lowest synthetic setting |
| Mixed Fabrics | Lower heat | Use a safer, lower setting |
Important Tip
Always turn the steam OFF because it adds water and stops glue from sticking well. This is one of the biggest beginner mistakes.
Step 3: Position the Patch
Place the patch, make sure the side of the patch which has glue on it is facing down towards the fabric. Make sure the patch is straight before you press it with the iron. Use tape or pins to hold patches in place.
If you think you are capable of pressing a patch without the need to hold the patch in place, you do not have the need to. For letter patches, use a ruler to keep letters straight and make sure collars and sleeves stay flat before pressing.
Step 4: Apply the Press Cloth
Put a thin cloth over the patch. You can use:
- Thin cotton cloth
- White pillowcase
- Parchment paper
The cloth protects the patch and fabric from heat damage. Do not use wax paper or plastic wrap.
Step 5: Press
Press the iron down firmly. Do not move the iron around because sliding can shift the patch. Hold the iron still for 30 to 60 seconds. Bigger patches may need extra pressing in sections.
Timing Guide
- Light fabric: press for 30 seconds
- Medium fabric: press for 45 seconds
- Denim and canvas: press for 60 seconds
Step 6: Press From the Back
Let the patch cool for 1 to 2 minutes first, then turn the clothes inside out. Press the back of the patch area for 30 seconds. This helps the glue stick stronger from both sides.
Step 7: Check Adhesion & Cool
Let the patch cool fully before touching it. Wait at least 5 minutes, then gently check the edges. If the corners lift up, repeat the ironing steps again. Do not wash the clothes for 24 hours.
How to Iron on Girl Scout Patches
Step 1: Check the Uniform Fabric
To iron on Girl Scout patches, these uniforms are usually khaki or brown. They are often a mix of cotton and polyester, but test the heat on a hidden area first.
Step 2: Set the Iron
Use medium to high heat (cotton setting) and turn the steam off. For Daisy and Brownie uniforms, use slightly lower heat
Step 3: Place the Patch
Put the patch where you want it on the vest or sash, and make sure it is straight before ironing
Step 4: Prepare the Surface
For vests, place a rolled towel inside to make it flat, for sashes, place a hard board inside
Step 5: Iron the Patch
Press firmly for 30–60 seconds and do not move the iron while pressing
Step 6: Iron from the Inside
If possible, turn the vest inside out. Press the back side of the patch for better sticking
Step 7: Let It Cool
Let the patch cool completely. Do not touch or move it right away
Step 8: Final Check
Gently check if all edges are stuck and Re-press any loose corners if needed
Ironing by Fabric Type
How to Iron on Patches to a Jean Jacket / Denim Jacket
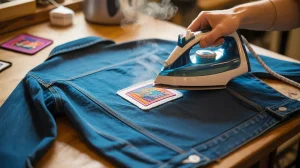
Denim is the most forgiving fabric. Use cotton or a high heat setting, no press cloth is required, though it is still recommended to protect embroidery threads. For jeans with knee holes, insert a wooden block inside before pressing to create a flat surface. For inside knee reinforcement patches, press from the inside out.
How to Iron On Patches on Polyester
To iron on patches on polyester, use the lowest effective setting (240–280°F), never steam, always use a thick press cloth, limit press time to 30 seconds max, and allow it to fully cool before checking. Heat press machines give better results than domestic irons on polyester as they apply uniform pressure.
How to Iron On Patches on Hats & Caps
Custom patches for hats that are flat brimmed are easy to apply, treat them as standard cotton. Curved baseball caps require stuffing the inside with a firm, rolled towel before pressing to create a flat working surface. Structured hats like trucker caps and fitted caps have stiff fronts, which work well, unstructured caps need more care to avoid crushing. For Mesh-backed trucker hats, only press on the structured cotton front panel, never on mesh.
How to Iron On Patches on Backpacks
Most backpacks are polyester or nylon, so use low heat and shorter press time (20–30 seconds). Empty the backpack completely and stuff the section you’re patching with a firm book or wooden board to create a flat pressing surface. For nylon backpacks, use extra-low heat and a thick press cloth. For canvas backpacks, the standard method applies. Avoid pressing near zippers or hardware.
How to Iron On Patches on Letterman Jackets and Bomber Jackets
Letterman jackets may have a wool body and leather sleeves. Only apply to the wool sections, never on leather. Use medium heat with a press cloth. Bomber jackets are usually made of nylon, use very low heat, with thick press cloth.
How to Iron on Patches on Shirts / T-Shirts
T-shirts are made of cotton, the standard method will do, they can endure high heat. Turn the shirt inside-out and put a cardboard or a book in it to prevent the iron from bonding front to back.
Sweatshirts/hoodies are made of a cotton-polyester blend, can endure medium heat, always use a press cloth, and prevents the fluffy fleece texture from pressing flat permanently. The fleece surface means slightly longer press time (50–60 seconds) due to insulation.
How to Iron On Patches on Nylon
Nylon is the trickiest synthetic. It melts at very low temperatures, no more than around 212°F. Use the absolute lowest iron setting, thick press cloth, and press for a maximum of 15–20 seconds. Check immediately.
For best results on nylon, heat press machines with adjustable pressure are better than irons that are available at home. Consider sewing as a backup method for nylon garments where durability matters.
How to Iron on Patches on a Tote Bag / Canvas Bag
Canvas is similar to denim, and is cotton-based and forgiving. Canvas bags and tote bags work perfectly with iron-on patches. For canvas sneakers, insert a firm wooden block inside. Use high-medium heat, the standard method applies. Canvas bags and backpacks are actually ideal for durable custom patch surfaces for longevity.
| Fabric / Item | How to Iron On Patches | Key Tips |
| Jean Jacket / Denim Jacket | Use high heat or cotton setting | Very easy fabric. Press from inside for the knee areas. A wooden block helps make the surface flat. |
| Polyester | Low heat only (240–280°F) | No steam. Use a thick press cloth. Short press (max 30 sec). Cool fully before checking. |
| Hats & Caps | Depends on style | Flat caps = normal method. Curved caps = stuff inside with a towel. Only press the front panel of trucker caps. |
| Backpacks | Low heat (most are polyester/nylon) | Empty the bag first. Stuff inside with a book/board. Avoid zippers. |
| Letterman Jackets | Medium heat (wool parts only) | Never press on leather sleeves. Use a press cloth always. |
| Bomber Jackets | Very low heat | Usually nylon, so go gently. Use a press cloth and quick press. |
| Shirts / T-Shirts | Cotton = high heat, blends = medium | Turn inside out. Use cardboard inside the shirt. |
| Hoodies / Sweatshirts | Medium heat | Always use a press cloth. Fleece needs longer press time. |
| Nylon | Very low heat only (212°F max) | Very quick press (15–20 sec). Thick press cloth is a must. |
| Tote Bags / Canvas Bags | Medium-high heat | Very strong and easy fabric. Great for long-lasting patches. |
| Canvas Shoes | Medium heat | Put a firm block inside the shoe before pressing. |
Fabrics to Avoid for Iron-on Patches
Some fabrics do not work with iron-on patches because heat can damage them or stop patches from sticking.
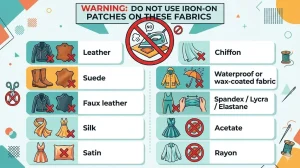
Do not use iron-on patches on
- Leather
- Suede
- Faux leather
- Silk
- Satin
- Chiffon
- Waterproof or wax-coated fabric
- Spandex / Lycra / Elastane
- Acetate
- Rayon
- These fabrics are too delicate or heat-sensitive
- Iron heat can burn, melt, or damage them
| Fabric | Why to Avoid |
| Leather | Heat can burn and damage it |
| Suede | Very delicate, gets ruined easily |
| Faux Leather | Melts under heat |
| Silk | Scorches quickly |
| Satin | Heat marks and damage |
| Chiffon | Too thin and fragile |
| Waterproof / Wax-coated Fabric | Coating melts, the patch won’t stick |
| Spandex / Lycra / Elastane | Heat destroys stretch |
| Acetate | Melts under low heat |
| Rayon | Weak fabric, can burn or distort |
Patch-Type Specific Techniques
Embroidered Patches
The standard method works perfectly. Most durable iron-on patch type. The raised embroidery means that press cloth is essential to prevent flattening of threads. Press from the back (Step 6) is particularly important for embroidered patches.
Chenille Patches
Chenille patches have a fluffy, velvet-like texture. Use medium heat. Always use a thick press cloth to protect the chenille surface. Press from the back only, pressing on the front will flatten and damage the texture permanently. Allow longer cooling time, 10 minutes minimum.
Sequin Patches
Sequins are plastic, so they can melt under direct high heat. Use low-medium heat, always a thick press cloth, and press for only 20–30 seconds at a time. Avoid any sliding motion. After pressing, check that no sequins have melted or fused. For very delicate sequin patches, consider sewing instead.
Letter & Number Patches
Alignment is the main challenge. Use masking tape or chalk to mark a guideline before pressing. Press one letter at a time. For full words, work outward from the center. Use a ruler to check the spacing between letters before pressing these creative custom patches.
Woven Patches
Woven patches have a flat, fabric-like surface. They bond very well with the iron-on method. Standard technique applies. They’re less thick than embroidered patches, so they tend to feel more discreet on the garment.
Sublimated Patches
Handle with care, the printed surface can be affected by high heat. Use medium heat and always use a press cloth. Never press directly on the face of a printed patch.
| Patch Type | How to Apply | Important Tips |
| Embroidered Patches | Use standard iron-on method | Use a press cloth so threads don’t flatten. Press from the back for best hold. |
| Chenille Patches | Use medium heat and press gently | Always use thick cloth. Press from back only. Let cool for 10 minutes. |
| Sequin Patches | Use low to medium heat | Sequins can melt. Press for 20–30 seconds only. Do not slide iron. |
| Letter & Number Patches | Place carefully, then press one by one | Use tape or chalk to keep straight. Use a ruler for spacing. |
| Woven Patches | Use standard method | Thin and easy to apply. Bonds smoothly with fabric. |
| Sublimated Patches | Use medium heat only | Always use press cloth. Never press directly on the printed surface. |
No-Iron Methods
Hair Straightener
Heat the straightener to the medium setting. Place the garment flat, position the patch, lay a piece of parchment paper over it, clamp the straightener down firmly, and hold for 30 to 45 seconds. Move to edges if needed. Works well for small patches in tight spots where a regular iron can’t reach, e.g., narrow collar areas, cuffs.
Heat Press Machine
A professional method is used for large production. Set to 320°F for cotton or denim, 270°F for polyester. Apply 40 to 60 psi pressure for 15–20 seconds. Results are significantly more durable and consistent than domestic iron. Ideal for bulk application and commercial garment decoration. Covered in more detail in the polyester blog.
Cricut EasyPress
It is a consumer-grade heat press. Temperature and pressure are more controlled than a domestic iron. Use the Cricut heat guide app to find the right settings for each fabric type. The results are between a domestic iron and a commercial press in quality.
Fabric Glue
For heat-sensitive fabrics where ironing is harmful. Use fabric-specific adhesive. Apply a thin layer of glue to the patch backing, position, press firmly by hand, and allow to dry. Less durable than heat bonding, not recommended for high-wear areas. Best for decorative patches on delicate items.
Sewing as a Reinforcement / Alternative
For maximum permanence on any fabric, including leather, suede, nylon, and stretch fabrics, where iron-on won’t work or won’t last. A simple running stitch or blanket stitch around the patch edge takes 5 to 10 minutes and makes the patch attachment permanent.
How to Remove Iron-on Patches
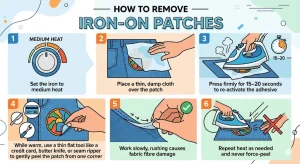
General Removal Method
- Set the iron to medium heat
- Place a thin, damp cloth over the patch
- Press firmly for 15–20 seconds to re-activate the adhesive
- While warm, use a thin flat tool like a credit card, butter knife, or seam ripper to gently peel the patch from one corner
- Work slowly, rushing causes fabric fibre damage
- Repeat heat as needed and never force-peel
Removing Adhesive Residue
Patches often leave sticky glue-type residue after being removed. Here is how to remove these types of residue:
- Using Rubbing Alcohol:
Dip a clean cloth in alcohol and apply it to the glue residue that remains from the patch. Leave it on for approximately 30 seconds, then use the cloth to rub the area. Most fabrics should respond well to this method.
- Using Acetone:
Acetone is a much more powerful solvent choice than rubbing alcohol. It could probably remove any remaining glue. However, on occasion, it has not appeared to be good for certain types of fabrics. Always test on a piece of fabric that is not noticeable before proceeding with the acetone removal method.
- Using an Adhesive Remover:
If you have an adhesive removal product, make sure that the product will remove any type of residual adhesive from your patch. It works well with most of the fabrics.
- Using Heat and a Piece of Tape:
Heat the remaining adhesive particles with a heating object such as a hair dryer. Place a piece of clean tape over the heated adhesive and pull the tape away from the fabric to remove the adhesive.
- Using Soap and Water:
If the glue type of adhesive was applied to a 100% cotton fabric, water and dish soap may allow for the glue to be scrubbed off easily.
| Method | How to Do It | Notes |
| Rubbing Alcohol | Put alcohol on a cloth, press on glue, wait 30 seconds, then rub gently | Works well on most fabrics |
| Acetone | Apply a small amount on glue, rub gently | Very strong, test on hidden area first |
| Adhesive Remover | Apply product to sticky area and wipe off | Safe for most fabrics |
| Heat + Tape | Warm glue with hair dryer, press tape on it, pull off slowly | Repeat if needed |
| Soap + Water | Mix soap with water and rub on cotton fabric | Best for 100% cotton only |
Removing Patches from Specific Fabrics
| Fabric | Simple Removal Method |
| Denim | Denim is strong and handles heat well. Use heat and peel slowly. |
| Cotton | Use normal heat carefully. Check if the patch colours spread before heating again. |
| Polyester | Use very low heat only. Too much heat can damage polyester. Short heating works better. |
| Nylon | Use very low heat. Remove stitches first if possible. |
| Leather / Suede | Do not use iron heat. Use adhesive remover carefully with a cotton swab. |
| Wool | Use medium heat and a damp cloth. Be gentle because wool is soft when warm. |
| Uniform / Embroidered Fabric | Patch marks may stay after removal. Some spots may not look perfect again. |
How to Make Your Own Iron-On Patches By Hand
By Hand / Embroidery
Step 1: Make Your Design
- Draw or stitch your design on fabric
- You can embroider by hand or with a machine
Step 2: Cut the Patch
- Cut around the design carefully
- Leave a little extra fabric around the edges
- This helps the patch stay strong
Step 3: Add HeatnBond Adhesive
- Place the HeatnBond sheet on the back of the patch
- This turns the patch into an iron-on patch
Step 4: Press the Adhesive
- Set the iron to about 300°F
- Press the adhesive for 2–3 seconds only
- Do not fully bond it yet
- Light heat is enough for this step
Step 5: Trim the Adhesive
- Cut the extra adhesive around the patch
- Match the adhesive to the patch shape
With an Embroidery Machine
Step 1: Set Up the Embroidery Machine
- Turn on the embroidery machine
- Add a patch-backing stabilizer to the fabric
- The stabilizer helps the patch stay strong while stitching
Step 2: Stitch the Design
- Load your patch design into the machine
- Start stitching the patch
- Let the machine finish the full design carefully
Step 3: Cut the Patch
- Remove the patch from the machine
- Trim the stabilizer and extra fabric around the edges
- Cut close to the patch shape neatly
Step 4: Add Iron-On Adhesive
- Place the iron-on adhesive on the back of the patch
- This turns the patch into an iron-on patch
Step 5: Press the Adhesive
- Use a warm iron to press the adhesive lightly
- Follow the adhesive instructions carefully
With a Cricut Machine
Step 1: Set Up the Cricut Machine
- Turn on the Cricut machine
- Use a Cricut Fabric Grip mat for fabric patches
- Add the rotary blade for cutting fabric
- Cricut Maker works very well for patch making
Step 2: Make or Upload the Design
- Create your patch design on the Cricut app
- You can also upload your own artwork or logo
Step 3: Cut the Patch Material
- Place fabric or printable iron-on vinyl on the mat
- Let the Cricut machine cut the design shape
Step 4: Weed the Extra Material
- Remove the extra vinyl or fabric around the design
- Keep only the patch design
With an Inkjet Printer / Iron-On Transfer Paper
Step 1: Get Iron-On Transfer Paper
- Buy iron-on transfer paper from a craft store
- This special paper helps printed designs stick to clothes
Step 2: Make the Design
- Create or choose your design on a computer
- Photos, logos, and drawings work well
Step 3: Print the Design
- Print the design on the transfer paper
- Many papers need mirror-image printing first
- This helps the design face the right way after ironing
- Follow the instructions that come with the paper
Step 4: Cut Around the Design
- Carefully cut around the printed patch
- Remove extra paper around the edges
How to Add Iron-On Backing to Existing Patches
Step 1: Get Iron-On Adhesive
- Buy HeatnBond Ultrahold adhesive from a fabric or craft store
- This special sheet turns sew-on patches into iron-on patches
Step 2: Cut the Adhesive
- Place the patch on the adhesive sheet
- Cut the adhesive to match the patch shape and size
Step 3: Place the Adhesive on the Patch
- Put the adhesive on the back of the patch
- Make sure the glue side touches the patch back
Step 4: Press With an Iron
- Set the iron to about 300°F
- Press for 2–3 seconds only
- Do not press too long
Troubleshooting & Common Mistakes
Patch not sticking/lifting edges
The patch is not sticking because it did not get enough heat or pressure. Press the iron harder and for about 60 seconds, use a hard, flat surface, press again from the back and let it cool before checking.
Patch falling off after washing
The patch was not stuck properly before washing. To prevent the patch from falling off, press it again using correct heat and pressure, wash clothes inside-out on a gentle or cold wash, and sewing the patch can help it stay longer.
Adhesive residue around the patch
Too much glue melted out during ironing. Clean gently with rubbing alcohol while it is still warm. Next time, cut the glue to the exact patch size.
patch shifted while ironing
The patch moved because the iron was moved or slid. Hold the iron still when pressing. Use pins or tape to hold the patch in place. Let it cool before touching it.
Fabric burnt or damaged
The heat was too high for the fabric. Always use the correct heat and a cloth on top, damage cannot be fixed, so be careful.
Patch feels hard or stiff
Too much heat or glue was used, this can make the patch feel stiff, and it may become a little softer after washing.
Press cloth stuck to the patch
The wrong material was used, like plastic or wax paper, use only cotton cloth or parchment paper, soak gently in warm water if it sticks.
Patch looks flat or embroidery is crushed
Iron was pressed directly on the patch, always use a cloth between the iron and the patch, this keeps the patch soft and nice-looking.
| Problem | Why It Happens | Simple Fix |
| Patch not sticking / lifting edges | Not enough heat or pressure | Press harder for 60 seconds, use a hard flat surface, press from back, let it cool before checking |
| Patch falling off after washing | Not bonded properly before wash | Re-press with correct heat, wash inside-out on gentle/cold cycle, sewing helps it last longer |
| Adhesive residue around patch | Too much glue melted out | Clean with rubbing alcohol while warm, next time cut adhesive to patch size |
| Patch shifted while ironing | Iron was moved during pressing | Hold iron still, use pins or tape, let it cool before touching |
| Fabric burnt or damaged | Heat too high for fabric | Use correct heat and press cloth, damage cannot be fixed |
| Patch feels hard or stiff | Too much heat or glue used | This is normal sometimes, it may soften a bit after washing |
| Press cloth stuck to patch | Wrong material used (plastic/wax paper) | Use cotton cloth or parchment paper, soak gently in warm water if stuck |
| Patch looks flat / embroidery crushed | Iron pressed directly on patch | Always use a cloth on top to protect the design |
Washing & Maintaining Patched Garments
How long do iron-on patches last on your clothing depends on how precisely you take care of them and how carefully you follow the below washing and drying instructions.
Washing Instructions
- Wait 24 hours before washing for the first time.
- Turn the garment inside out every time you want to wash it.
- Use cold or warm water, never hot, because hot water reactivates and makes the glue weak.
- The gentle or delicate cycle reduces mechanical stress on patch edges.
- Avoid detergents that are harsh or bleach near patched areas.
Drying Instructions
- Air drying is best.
- Tumble drying with heat weakens the adhesive bond over time.
- If using a dryer, use the lowest heat setting.
- Never twist garments with patches.
How to Make Patches Last Longer
- Add the stitching on corners, hand sewing, blanket stitch or machine sewing, straight stitch around the edge.
- Apply a thin layer of fabric glue around the edges after ironing as an extra sealant.
- Re-press patches periodically every 10 to 15 washes to reactivate the adhesive.
- Avoid putting patched areas through the wringing.
- Do not fold the patch area.
Ordering Custom Iron-on Patches
How to palace order at Patch Makers USA is as simple as following steps:
Step 1: Decide Why You Need Patches
Think about why you want patches. It can be for school, sports, work, or events. This helps you choose the right design.
Step 2: Pick Your Patch Style
Choose what your patch will look like. All these patches can be iron-on
- Embroidered = stitched look
- Chenille = soft and fluffy
- Woven = smooth and detailed
- Printed = full-colour design
Step 3: Make or Upload Your Design
Draw your design or use a logo. Upload it to the website. Keep the design simple and clear.
Step 4: Choose Size and Shape
Pick how big your patch will be. Choose any shape, like a round or a square. Choose iron-on backing.
Step 5: Place Your Order
Go to the order page to contact the Patch Makers USA to get a quote. Fill in your details and send your design. And our experts will reach out to you if you have any query.
Step 6: Get Free Help
You can ask for help with your design. Experts at Patch Makers USA can make it look better. This helps your patch look nice and clean.
Step 7: Production and Delivery
Your patch is made after you confirm it. At Patch Makers USA, only Good materials are used to make it strong. Delivery is free for custom orders.
Why Choose Patch Makers USA
- Strong and long-lasting material
- Clean and nice designs
- Easy ordering process
- free mock-ups
- Help with your design if you need it
- Fast making and delivery
Application FAQs
How long do you iron on patches?
Approximately 30–60 seconds. The thinner fabric will take a shorter amount of time to dry than the thicker fabric. Be sure to press the back side as well.
Do you use steam when ironing on patches?
No. You should always turn the steam function off and not use steam to iron the patch on your item.
What temperature should I use?
If using cotton or denim materials, use high heat to press the patch on your item. If using polyester or nylon materials, use low heat to press the patch with your iron.
Do you need a press cloth?
Yes. Use a cotton cloth or pillowcase to protect the patch.
Can you iron on patches without an iron?
Yes. You may also use a hair straightener or heat press to apply heat and pressure to the patch, or you can sew the patch.
How do you iron on patches without parchment paper?
Use a cotton cloth or a clean pillowcase instead.
How long before washing?
Wait at least 24-48 hours before washing your item.
Fabric & Compatibility FAQs
Can you iron on patches to polyester?
Yes, but with care. Use low heat only, turn the steam off, and press for 30 seconds. Too much heat can melt polyester.
Can you iron on patches to a hat?
Yes. Put a towel inside the hat. Use medium heat. Do not iron mesh parts because they can melt.
Can you iron on patches to leather?
No. Heat damages the leather, so sew the patch instead.
Can you iron on patches to nylon?
Yes, but very carefully. Use very low heat and press for 15–20 seconds. Sewing is better.
Can you iron on patches to jeans?
Yes. Jeans are the best fabric. Use high heat and press for 45–60 seconds.
Why won’t my iron-on patch stick?
The heat may be too low, or the steam may be on. The surface may be soft. Press harder and longer, and let it cool before checking.
Removal FAQs
How do you remove iron on patches?
Using a preheated iron, heat the patch for 15 to 20 seconds, avoiding using steam. Use a card or a flat thing carefully to push up one corner once it is heated. Peel with care and keep on doing the reheat if you need to. Avoid trying to pull it off if it is cold.
How do you remove adhesive residue from iron on patches?
Use an easy cloth and rubbing alcohol. Lightly wipe until the sticky area is taken out. If necessary, you can also use a glue remover. Always start with a tiny, hidden spot for testing purposes.
Can iron on patches be removed without damaging the garment?
Usually, yes, if done carefully. Use an iron to increase the temperature of the patch for 15 to 20 seconds. If needed, use a moist towel to put on top. While it’s warm, carefully lift a corner with a card. Use rubbing alcohol to take out any unwanted adhesive residue.
How do you remove Girl Scout iron on patches?
Heat the patch with a medium-hot iron (no steam) with a damp press cloth over it for 15–20 seconds. Gently peel from one corner using a credit card while warm. The khaki/poly-blend uniform responds well to this method. Clean any residue with isopropyl alcohol and a cotton pad. If the patch is on a vest or sash, work on a firm, flat surface.
Ready to Put Iron on Patches on Your Clothing
Iron-on patches are a simple method to give any piece of clothing or thing a fashionable appearance, identity, and style. But doing things in the right way always brings the best output. How long your patch stays in place on the fabric depends on the fabric you set the patch on, the heat you use to attach it, and how well and with care you follow each step.
Every material wants a slightly different method, ranging from hats, backpacks, and scout vests to denim jackets and school uniforms. Your patches remain resistant to damage, neat, arranged, and eye-catching when you take your time and avoid any typical missteps. A perfect patch ultimately depends on how well it is applied and positioned, not simply how it appears, but it matters as well.
So if you want a perfect-looking custom patch, contact Patch Makers USA right this instant and receive your precisely crafted patches at your doorstep.
